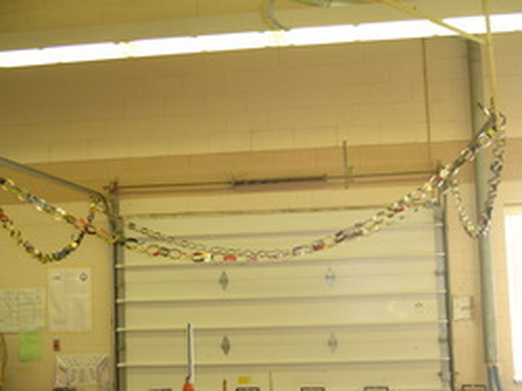
Chain link
We had to make a creative chain link to add to the chain made by all of Mr. Ramos' engineering design students.
Process:
1. Cut a piece of aluminum.
2. Paint the aluminum with different colors to make design. Let dry with the 1000 degrees heat gun.
3. Fasten the link to the chain using the fastnering tool (I forget what it's called)
4. Have chain hang in the room.
Output: My chain was a mixture of blue and white. I used a lot of paint and made it a Somerset Blue Raiders chain link.
Feedback: I didn't really receive much feedback as I wasn't the only person with the blue and white idea.
What did I learn?: I learned to use the heat gun better and that your paint can bubble pretty easily. I also learned how to fasten stuff together with those spcial pins Mr. Ramos has.
What would I do differently?: I would probably use less paint as my project was hard to dry. I would probably to something a little more unique with other colors besides blue and white.
Rubik's Cube
The challenge of this project was to create a replica of a Ruibk's cube. The cube is 3 1/4 inches wide and high as it is a perfect square. We had to find a way to recreate the realistic slightly rounded edges and corners as well as the painted squares of each side of the cube.
Input Factors:
1. First you have to know the size of the cube.....which is 2.25 x 2.25 x 2.25 inches.
2. You need to know which colors the sides of the cube are in order to paint the cube correctly.
Research:
There wasn't much to the research on this project. All you had to do was look at an actual Rubik's cube and identify its qualities and what it looks like. Thie included the rounded edges and the black coloring between each little block.
Procedure:
1. Draw a picture, to scale, of the Rubik's cube on graph paper. (in an oblique drawing)
2. Rip a piece of wood atleast 10 inches long. (the width is already 3/4 of an inch)
3. Cut the piece of wood into three blocks, with dimensions of 3 1/4 x 3 1/4 x 3/4.
4. Round every edge and corner of each of the blocks at one of the sanders.
5. Glue the three pieces together, making the sides flush and into a perfect cube.
6. Paint each side of the cube a different color as if the Rubik's cube was solved. (6 colors = red, blue, orange, green, yellow, white)
7. Go over the rounded edges and inbetween each little colored block (9 per side) with a black Sharpie.
8. Inscribe my initials and the tabe into the side of the cube with the Dremel tool.
9. Let dry and turn into Mr. Ramos.
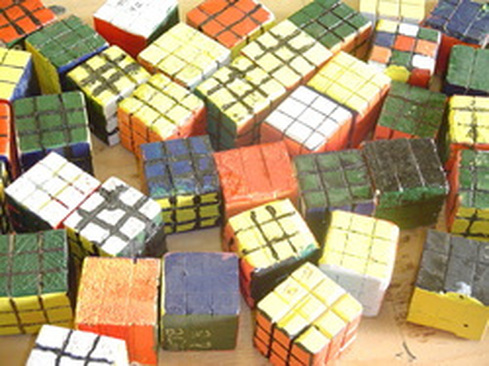
10. Peer grade the cubes!
Final Output:
My Rubik's cube actually didn't come out too bad. THere were just a few small spots of dicoloring around the cube. My black lines were also a little bit off in a few placesas they came out of the grooves a few times. But, the cube is the right size, with the right colors, and all the small details are good except it can't move.
Feedback:
My feedback was pretty good during this project. Mr. Ramos suggested I use a marker instated of paint for the black lines which really helped my Rubik's cube to look a lot neater as others made a mess with the black paint. I also got a few bubbles while drying my paint and it was suggested that I lower the heat and further the distance between the heat gun and my cube. I was also complimented by a few other students as they thought I made a neat and accurate replica.
What did I learn?: I learned how to use the Dremel better and got experience with the sander, compound miter saw, and bandsaw. Now I'll be able to have basic concepts needed if I ever have a little project or if something needs to be done at home.
What would I do differently?:
I would probably make the little squares alternating colors, instead of having one side = one color. It would look a lot cooler and require a lot more skill, but I think I'd be able to do it.
Input Factors:
1. First you have to know the size of the cube.....which is 2.25 x 2.25 x 2.25 inches.
2. You need to know which colors the sides of the cube are in order to paint the cube correctly.
Research:
There wasn't much to the research on this project. All you had to do was look at an actual Rubik's cube and identify its qualities and what it looks like. Thie included the rounded edges and the black coloring between each little block.
Procedure:
1. Draw a picture, to scale, of the Rubik's cube on graph paper. (in an oblique drawing)
2. Rip a piece of wood atleast 10 inches long. (the width is already 3/4 of an inch)
3. Cut the piece of wood into three blocks, with dimensions of 3 1/4 x 3 1/4 x 3/4.
4. Round every edge and corner of each of the blocks at one of the sanders.
5. Glue the three pieces together, making the sides flush and into a perfect cube.
6. Paint each side of the cube a different color as if the Rubik's cube was solved. (6 colors = red, blue, orange, green, yellow, white)
7. Go over the rounded edges and inbetween each little colored block (9 per side) with a black Sharpie.
8. Inscribe my initials and the tabe into the side of the cube with the Dremel tool.
9. Let dry and turn into Mr. Ramos.
10. Peer grade the cubes!
Final Output:
My Rubik's cube actually didn't come out too bad. THere were just a few small spots of dicoloring around the cube. My black lines were also a little bit off in a few placesas they came out of the grooves a few times. But, the cube is the right size, with the right colors, and all the small details are good except it can't move.
Feedback:
My feedback was pretty good during this project. Mr. Ramos suggested I use a marker instated of paint for the black lines which really helped my Rubik's cube to look a lot neater as others made a mess with the black paint. I also got a few bubbles while drying my paint and it was suggested that I lower the heat and further the distance between the heat gun and my cube. I was also complimented by a few other students as they thought I made a neat and accurate replica.
What did I learn?: I learned how to use the Dremel better and got experience with the sander, compound miter saw, and bandsaw. Now I'll be able to have basic concepts needed if I ever have a little project or if something needs to be done at home.
What would I do differently?:
I would probably make the little squares alternating colors, instead of having one side = one color. It would look a lot cooler and require a lot more skill, but I think I'd be able to do it.
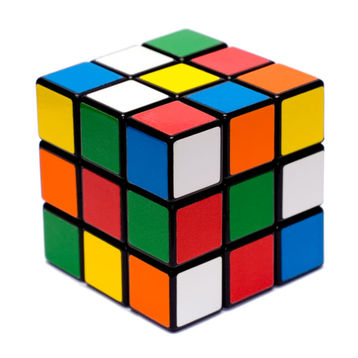
This is a Rubik's cube
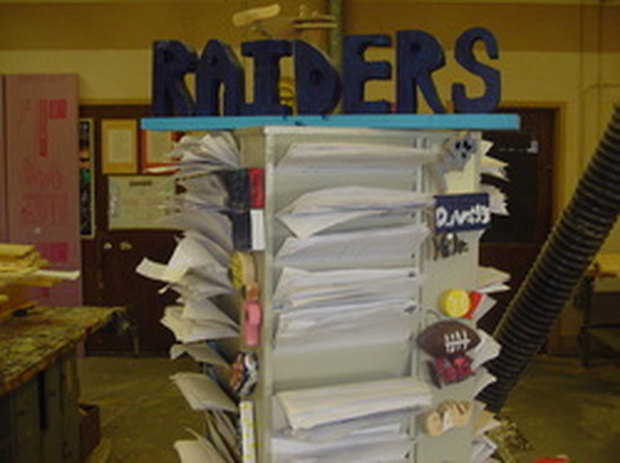
Magnet Project
For this project, I had to design a magnet, no bigger than 3 x 5, to personalize my file in the file tower. It had to represent me and would mark my spot for easy access. This was part of our training before our safety exam.
Input factors:
1. We needed to know the size of the space next to our files......its about 3 x 5.
Research:
1. There really wasn't any research needed as this project was something creative we made to represent ourselves.
Procedure:
1. Cut a piece of wood 3 x 5 inches using the tablesaw and then the compound miter saw.
2. Draw a design of your model on a piece of graph paper.
3. Draw the design on your bloak of wood.
4. Cut the model out using the bandsaw.
5. Round some of the edges using the beltsander.
6. Paint your model any color you'd like.
7. Let dry, of course. Can use a heat gun.
8. Drill a hole in the back of your model to fit the size of the magnet. Push magnet into hole.
9. Stick to filing tower next to your file!
Output: My final output was nice. It was black and gray, creatively spelling out my name, Mike. It was a little small, but it was still big eneough as it represented me. My letters were semi curved and had a cool feel to them.
Feedback: I got some good feedback as it looked cool with the color scheme and the creative letters. I was also told that I didn't need to glue my magnet to my model as it fit perfectly into lkace.
What did I learn?: I learned hoe to use the bandsaw to carve out shapes for the first time. IT was kind of cool to see how the bandsaw bent as you turned the figure. It also helped with my painting skills. Next time I need something to be carved out...I'll know to use a bandsaw.
What would I do differently?: I'd probably make my letters thick making them less likely to break as some of the areas are rather skinny right now. I also would've colored it more colorful and taken my time to make the painting neater.
Personalized Name Project
I had to find a word with atleast seven letters or numbers, that symbolized me. I got lucky as my first name has exactly seven letters. I had to make it personalized. Each letter had to be 5 x 3 inches (tolerance= 1/8 inch) and would be connected by a wooden board.; This is our first big project.
Input Factors:
1. Each letter has to be 3 x 5 inches.
2. Need to have atleast 7 letters.
Research: There wasn't really any research neede, again, as this was a creative project about ourelves.
Procedure:
1. Draw a model on graph paper.
2. A rip a piece of wood either 3 or 5 inches wide on the tablesaw.
3. Cut seven blocks each 3 x 5 inches on the compound miter saw.
4. Draw your letters on the blocks of wood. Make sure the letters go to the top, bottom, and sides of your block.
5. Cut each letter out with the bandsaw.
6. Paint each letter according to your color scheme...be creative.
7. Paint your piece of wood that will hold all your letters together.
8. Glue the letters to the board of wood.
9. Let sry and peer grade!
10. Draw an Oblique drawing of your model at its real size on 1/2" graph paper.
11. Color your picture.
12. Pick up project after school.
Output: My name project came out good. The latters have right edges and all the letters are capital. The letters are a baby blue color. They are glued to a white board in the back with 3/4 bewtween each letter. I then took a straw and kind of sprayed wite paint over me project. It gave it a pretty cool effect.
Feedback: Someone suggested that a try a different color other than what Mr. Ramos had...so I did. I mixed some white into the blue and made a cool baby blue. It was different and I was asked how I made it. People sais I did a good job as it lookd really square as a whole.
What did I learn?: I learned how to mix paint to make a color lighter and darker. I got a lot better at measuring and cutting things precisely as there was only 1/8 inch tolerance.
What would I do differently?: I'd make my figure more curvy instead of box like. You have some room to mess up here and there as you can make curves bigger and smaller...but the way I did it, you have to make sure everythings precise which makes a lot more work.

