Somerset Zoo Bridge Design Challenge
For this project, we had to design a bridge for the Somerset Zoo. The bridge had some specifications:
- Scale: 1/2'' = 1'
- Length= 20'
- Width= 10'
- Water Clearance= 2'
- Materials= concrete or wood
This bridge ha to carry animals over a small river in the zoo...
Research: We really didn't have any research for this project, but we did brainstorm ideas on different types of bridges and how we would build them.
Procedure:
1. Draw a design of your bridge on graph paper and get it approved by Mr. Ramos.
2. Start to build the bridge...
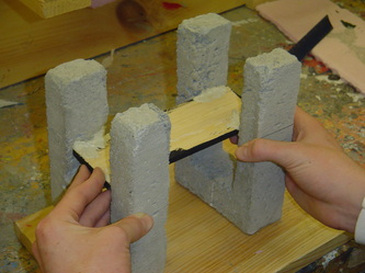
3. Cut pink foam to make two cement forms for our bridge.
4. Let the forms dry for atleast two days so you don't get a crack..
5. Cut pieces of wood on the bandsaw - this will be used to make the ramps and the road over the water.
6. Glue the pieces of wood together, cutting them to size so they are the exaact length.
7. Glue the road portion in the middle of the two concrete supports, connecting them and both sides of the bridge.
8. Glue the two ramps on either end of the bridge.
9. Paint all of the wooden portions of the bridge black.
10. Hang twisted thin metal from the two towers on the bridge, also string metal from the toers o the ground.
11. Draw and color a picture of your bridge as you see it in the surrounding Somerset Zoo!
Output: My bridge cam out pretty good in the end. The supports, or cement stands were a little crooked, but the rest came out pretty good. It was stucturely strong and met all the required requirements. Also, the animals were safe in crossisng the bridge!
Feedback: We got some good feedback as me and Mike Booth put a lot of effort into the bridge. People applauded us for our heavy work with the cement.
What did I learn?: I learned how to better use cement, but also have to twist the wired metal. It makes a cool, cable like thread that you can use to decorate the bridge with.
What would I do differently?: I would try to make the cement stands straighter, and also put more cable like wires on the bridge. I'd like to have them like handrails on the sides of the bridge to en sure even more safety for the animals. Who wants a penguin drowning in Somerset?
- Scale: 1/2'' = 1'
- Length= 20'
- Width= 10'
- Water Clearance= 2'
- Materials= concrete or wood
This bridge ha to carry animals over a small river in the zoo...
Research: We really didn't have any research for this project, but we did brainstorm ideas on different types of bridges and how we would build them.
Procedure:
1. Draw a design of your bridge on graph paper and get it approved by Mr. Ramos.
2. Start to build the bridge...
3. Cut pink foam to make two cement forms for our bridge.
4. Let the forms dry for atleast two days so you don't get a crack..
5. Cut pieces of wood on the bandsaw - this will be used to make the ramps and the road over the water.
6. Glue the pieces of wood together, cutting them to size so they are the exaact length.
7. Glue the road portion in the middle of the two concrete supports, connecting them and both sides of the bridge.
8. Glue the two ramps on either end of the bridge.
9. Paint all of the wooden portions of the bridge black.
10. Hang twisted thin metal from the two towers on the bridge, also string metal from the toers o the ground.
11. Draw and color a picture of your bridge as you see it in the surrounding Somerset Zoo!
Output: My bridge cam out pretty good in the end. The supports, or cement stands were a little crooked, but the rest came out pretty good. It was stucturely strong and met all the required requirements. Also, the animals were safe in crossisng the bridge!
Feedback: We got some good feedback as me and Mike Booth put a lot of effort into the bridge. People applauded us for our heavy work with the cement.
What did I learn?: I learned how to better use cement, but also have to twist the wired metal. It makes a cool, cable like thread that you can use to decorate the bridge with.
What would I do differently?: I would try to make the cement stands straighter, and also put more cable like wires on the bridge. I'd like to have them like handrails on the sides of the bridge to en sure even more safety for the animals. Who wants a penguin drowning in Somerset?
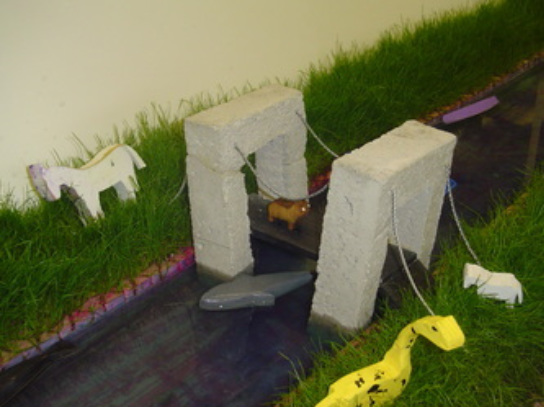
The finished bridge, pictured in the Somerset Zoo. You can see animals safely crossing the river over my bridge.
Propeller Design
For this project we had to first design a 12'' propeller. We had to make this propeller spin as fast as possible while in front of the wind tunnel. After being successful with our 12'' propellers, we upgraded them to 24'' propellers. The process was pretty much the same for both, but took a lot more work for the 24'' propeller.
Research: We went online in the CADD lab to research some windturbines. We researched what wind propellers look like to replicate them in our Engineering Design class.
Proedure:
1. Draw a scketch of the propeller on graph paper. Get it approved by Mr. Ramos. specs= 5/8 diameter center. 2-1/4" high, and 3/4" width
2. Rip a piece of wood on the bandsaw that is 2'' wide. Cut the piece of wood so its length is 24'' length.
3. Start shaving away at the wood with a cheese grater, applying the angle which you;d like.
4. Keep shaving until you have all four faces complete, with the opposites facing opposite directions.
5. Check the balance of the propeller, as you want both sides to be equal in weight to achieve a maximum velocity.
6. Test the propeller to see what you need to apprvoe on.
7. Shave more of the propeller, and sand all the rough faces/edges.
8. Drill two holes in the propeller, on opposite sides, to insert the two magnets in.
9. Have Mr. Ramos test the propeller to see who gets the top spee this year.
10. As long as it spimns, you win! And get points for success.
11. Paint the propeller if you feel like making it colorful.
Output: Mike Booth's and my propeller was completely made without using the bandsaw. We worked hard with our cheese graters making a nice propeller. Ours was third fastest in the class, making it a successful propeller.
Feedback: We received some good feedback from those who watched our propeller spin. It wasn't the fastest, but it was still pretty fast.
What did I learn?: I learned how to use the cheese grater, and how exhausting it can be. I also learned some of the qualities that can make aerodynamic, efficient wind propellers. I learned that a greater angle on the wings of the propller helps with its final velocity.
What would I do differently?: I would shave more wood off of my propeller to make it thinner in the airstream. I would also shave some more wood off of the middle of the propeller in order to make it weigh less and spin more easily.
Wind Turbine Truss Tower Designs
Research: We went back into the CADD lab to research some truss tower designs. We wee also told that we'd need a tail on the propeller so it is constantly facing into the wind. We need a supportive design and also a creative way so the propeller can spin all ways at the top of the truss support. The truss needs to be This may take some thinking homework to find an idea...
Procedure:
1. Draw a plan of your tower on three sheets of grpah paper taped together on pink foam. Get it apporved by Mr. Ramos.
2. Rip some strips of wood a quarter inch wide and high. Cut these to specific lengths you will need with the bandsaws.
3. Start building one side of the tower by gluing the pieces of wood on top of your sketch on the pink foam.
4. Build four identical sides.
5. Glue the four sides together, making a nice, sturdy, and standing tower.
6. Make a concrete base for the tower. Mix the cement and pour in the wet cement.
7. Wait a few minutes for the cement to settles, then put the tower in the cement.
8. Rivet a homemade aluminum anchor to the legs of the tower so they stay in the cement for good.
9. PLace the tower the way you want in the cement as you can't move it after.
10. Attach a small DC motor, protected by PVC pipe (use liquid nails to secure) to the top of the tower with a rotating platform.
11. Attach your small, 12'' propeller to the motor.
12. Attach a tail to the end of your rotating mechanism for the propeller to always be facing the wind.
13. Attach wires to your engine, and solder them to create a tough bond.
14. What happens next is in Term 4! Go to the Term 4 tab on the website to see what I did next!
Hydroponcis 3000
My flower growing in the Engineering Deisgn room isn't growing that well. I think I needs a bigger cup in order for its roots to grow as the stems starts to sprout. I also think I made need to change the sawdust in my cup in order for the water to filter through better. Otherwise, I think it will be a successful flower.
