Hydroponics Project
The challenge of this project was to provide the tools plants need to grow in the North Pole. Me and partner decided to take the not so beaten path and try something a little bit different while staying under $5000.
Research: We spent a few classes in the computer labs researching different plants to grow and how to grow them (what they need). My plant, strawberries, grows in bunches...this is where individual pots won't work. My friend and I found a unit for under $5000 and decided to make a model of it for our project.
Procedure:
1. Research to find what plant you want and how to grow it.
2. Tell Mr. Ramos your plant.
3. Draw your model on graph paper.
4. Color your picture.
5. Present your project to the class with Mr. Ramos recording the minute long presentation telling the class about how your hydroponics system works.
6. Watch everyone elses presentation too!
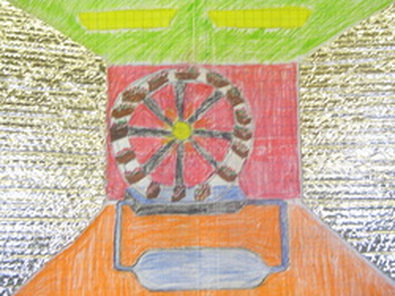
Output: Our project was very brightly colored. We had a wheel system where the plants very slowly rotated on a wheel. At the bottom of the wheel is a tub of water, where the plants get watered ten minutes per hour. There are heat machines and lights around the room to help with the climate. There is also insulation on this walls in the cold climate. Last, there is a filtration syatem to keep the water clean of clogging soil.
Feedback: Our project wasn't the neatest, but it was a pretty good idea. Lots of people liked our idea, but thought it could be neater looking.
What did I learn?: I learned that there really are a lot of options when you do research and you need to choose one that you are interested in. I also found out not to rush too much when you are presenting unless you'll run out of stuff to say to fill up a minute.
What would I do differently?: I would try to olor neater and drag out my presentation a little longer. Also, I would've done more research as if we were actually building the hydroponics room.
Research: We spent a few classes in the computer labs researching different plants to grow and how to grow them (what they need). My plant, strawberries, grows in bunches...this is where individual pots won't work. My friend and I found a unit for under $5000 and decided to make a model of it for our project.
Procedure:
1. Research to find what plant you want and how to grow it.
2. Tell Mr. Ramos your plant.
3. Draw your model on graph paper.
4. Color your picture.
5. Present your project to the class with Mr. Ramos recording the minute long presentation telling the class about how your hydroponics system works.
6. Watch everyone elses presentation too!
Output: Our project was very brightly colored. We had a wheel system where the plants very slowly rotated on a wheel. At the bottom of the wheel is a tub of water, where the plants get watered ten minutes per hour. There are heat machines and lights around the room to help with the climate. There is also insulation on this walls in the cold climate. Last, there is a filtration syatem to keep the water clean of clogging soil.
Feedback: Our project wasn't the neatest, but it was a pretty good idea. Lots of people liked our idea, but thought it could be neater looking.
What did I learn?: I learned that there really are a lot of options when you do research and you need to choose one that you are interested in. I also found out not to rush too much when you are presenting unless you'll run out of stuff to say to fill up a minute.
What would I do differently?: I would try to olor neater and drag out my presentation a little longer. Also, I would've done more research as if we were actually building the hydroponics room.
Hydroponics 3000
As an ongoing event all year, I'm yet ready to reflect back on this project. But I did need to bring in a cup. A drilled a good amount of holes in the bottom of my cup and filled it up with sawdust as a median. I had to use the sawdust from under the table saw as all other sawdust was too fine and wouldn't let the ater drain. I chose a flower to grow in my cup and I've just started to see the first green trunk sprouting from my emormous seed.
Global Communicator 3000 Design Project
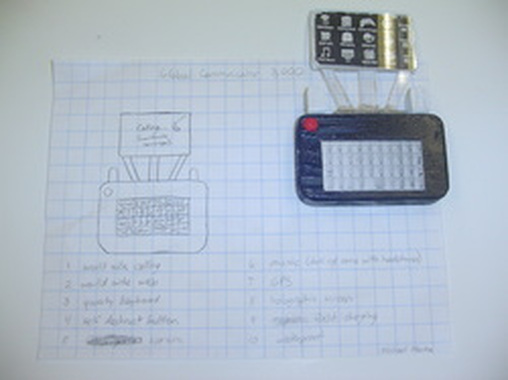
We had to create a global communicator with top of the notch features that we envision being available in the future. Unfortunately, we couldn't actually make them, but we could make some pretty creative models.
Research: I didn't have much research besides checking out cool features that current phones already have.
Procedure:
1. Design your phone on graph paper with a drawing.
2. Get it approved by Mr. Ramos.
3. List ten features the phone will have on your paper.
4. Build the phone with your features included.
5. Cut the wood for the phone.
6. DLue the picture of the keyboard to the phone.
7. Insert the magnet representing a camera in the back of the phone.
8. Cut the fake glass and glue the see through screen into place on the top of the phone.
9. Attach the antennas and self detruct button.
10. Take a picture of your phone and paper with Mr. Ramos to upload to his website.
Output: My phone was black with a qwerty keyboard in its center. It's a ock of wood with curved edges. It includes a self destruct button, and every option you could possibly hope for in todays phones. It even has a holographic screen that project from the hpone like in Star Wars. Some features include: camera,
Feedback: My project was creative, but it had no moving pieces. The top where the screen attached was also messy as I had to use a load of liquid nails to secure the screen into place on the phone.
What did I learn?: I learned that liquid nails are good for most, but not all materials. I also learned paint can also be used to glue stuff toegther like my back and front prts of my screen on my phone.
What would I do differently?: I would make a phone that has a screen that slides out to expose the qwerty keyboard underneath. Those were much more exciting to look at and when done correctly were pretty amazing.
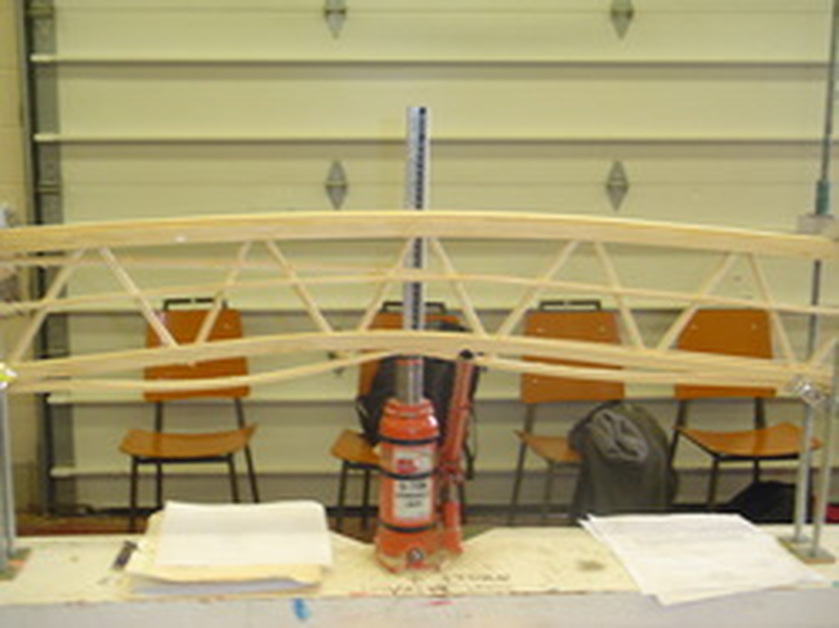
Truss Design Project
We had to make a truss (under 16 oz) to withstand the most pressure possible. Triangles, I knew, would be pivotal in ths project as they can absorb pressure greater than any other geometrical shape.
Research: I looked at a few bridges out there to see how they were constructed and got a few ideas.
Procedure:
1. Draw a picture of what your support will look like to scale on graph paper (actual size).
2. Rip pieces of wood 1/4 inch wide.
3. Create smaller pieces of wood by cutting strips of wood in half (down the midle) to create the design.
4. Tape your outer supports of the truss to your graph paper.
5. Start to glue you smaller pieces of wood to your outer supports to build your truss.
6. Glue strips of wood to the bottom and top of the truss.
7. Let dry with clamps to hold pieces in place.
8. Test out your truss on the tester with Mr. Ramos reading the pressure gauge.
Output: Our truss was in the middle of the pack with only 13 oz of weight. But it did hold until 145 lbs of pressure was out onto it. It had alternating syicks that made triangles and skinny, long strips to help support down the middle of the bridge. We were going to enlarge our support system until part of our support was stolen.
Feedback: Our truss was like a lot of others, as most people went for creating triangles. But, we made ours with precise measurements
(as noted by others). People liked the way that it different have any real weak spots where it would be vulnerable to failing easily.
What did I learn?: I learned that it can be tricky to rip a piece of wood with the same small consistency al the way through the tablesaw. I also got better at measuring and planning stuff out.
What would I do differently?: I would create more traingles on our bridge while trying to use the same amount of wood. I'd like to get out pressure to weight ratio higher as that is the real test to having a great truss.
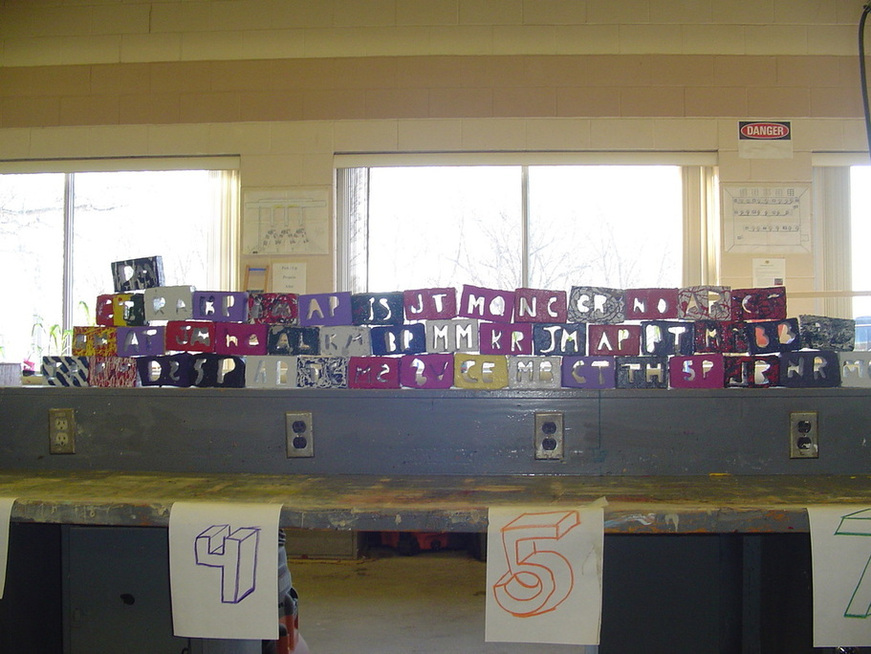
Concrete Brick
We had to make a concrete brick bearing our initials ao practice and get familiar with concrete.
Procedure:
1. Create a form for your brick using pink foam. Glue the form to a piece of paper and your initials (out of pink foam) in the middle of your form.
2. Mix concrete by adding the mixture and water toether until you have the right consistency.
3. Pour concrete into form. Make sure concrete fills up the whole form by tapping the sides of the form.
4. Scrape excess concrete off the top of the form so it can be available fo someone else. (Reduce. Reuse. Recycle.)
5. After letting it dry for two days, take concrete out of form using Mr. Ramos' tools. (saw, sshaver thing, jig saw blade)
6. If you experience failure, you might be able to glue your form back together using liquid nails.
7. Paint your brick a color and add to the wall of bricks!
Output: My brick contained two M's in its center as they are my initials. I painted by brick white (except for the bottom). But, my concrete didn't fully get into the cracks around the M's, but they are only noticebale from the back of the brick.
Feedback: By brick was average as the letters really stood out, but my brick did crack in ahlf and I neede to use liquis nails. Otherwise, people liked the white color on the brick.
What did I learn?: I learned how to create concrete forms and mix/pour concrete to make a structure. I'll be using this newly learned skill on my upcoming bridge project!
What would I do differently?: I would make the height of my letters smaller so I wouldn't experience I cracked brick due to lack of support. I also would've tapped and tried harder to make sure the concrete filled up my whole structure.